My Dad’s tuna salad

My Dad has an uncanny way with tuna salad, and although i have been trying to emulate it for the last 15 years no one can make it quite like him, but this does not stop me from trying! What I love about this salad is that although there are a whole lot of fresh delicious ingredients, the taste of the tuna is still evident and not hidden. The sharpness of the finely diced onions, the sweetness of the sliced spanish onions and the juicy tomatoes enhance the taste but the secret weapon has to be the addition of finely diced dill pickle which add both crunch and flavour.

IMG_5914
This recipe is extremely versatile, its satisfying enough to eat on its own, it makes a killer sandwich filling, you can use it to top boiled pasta for an easy pasta salad, the sky is really the limit here!

Enjoy and happy cooking xx

Ingredients

1 x 425g can of tuna chunks in oil (use a good quality brand, i use Sirena)
1/2 red onion diced VERY finely
100g sliced black olives (adjust depending on your feelings about olives)
3 large fat Polskie Ogorki Pickles (Polish Dill pickles)
1-2 firm Roma tomatoes diced finely
1 handful parsley, finely chopped
Juice from 3/4 lemon
1.5 tsp cumin
1 glug olive oil
salt and pepper to taste

Method

1. Flake the tuna chunks into a large bowl

2. Add the onions,  cumin, lemon juice, cumin , olive oil and salt and pepper and check seasoning

3. Fold through the olives, pickles, tomatoes and parsley and adjust seasoning again

4. Serve and enjoy!

Panko crumbed prawns (popcorn prawns)

Panko crumbed prawns

Panko crumbed prawns

I am absolutely in love with panko breadcrumbs. They take the concept of ‘crunch’ to a completely different level. I have used Panko on my arancini balls which was an amazing experience, and today, despite it being a part of my self proclaimed healthy food month, I had to try it on prawns.

I am a huge fan of marination, I marinate schnitzel prior to frying and wherever I think it can add value, I like to infuse any ingredient with flavour before cooking, and prawns are no different. Obviously because prawns are a more delicate meat I left them to marinate for a short period of time, but it did add to the complexity of flavour of the final result.

Crumbing – because I am observing a vegan plus seafood diet during St.Mary’s fast I couldn’t use eggs to crumb the prawns, so what I did was take the prawns out of the marinade, dust them with flour then put them back into the marinade and then crumb them. It worked quite well and each prawn morsel was exquisitely crunchy with every bite.

The prawns very much stand alone, and would be perfect as a pre dinner cocktail nibble or served with some tahini dip, I put these in soft floury rolls with tahini dip and salad which my family absolutely loved.

Try it and delight your family!

panko prawn sandwich

panko prawn sandwich

Ingredients

500g frozen raw peeled prawns (just about thawed)
3 eschallots, diced finely
Juice from 1 lemon
1 tbpsn white wine vinegar
1 tsp cumin
1/2 tsp sweet paprika
Salt and pepper to taste

1 cup plain flour
Panko breadcrumbs

Method

1. Combine the eschallots, lemon juice, vinegar, cumin, paprika and salt and pepper together in a bowl and adjust seasonings

2. Add the almost thawed prawns and mix well to combine. Leave to marinate until the prawns have completed thawing completely (about 1 hour)

3. Remove the prawns from the marinade and dust each prawn with flour then dump it back in the marinade and then into a bowl of panko breadcrumbs

crumbing the prawns

crumbing the prawns

4. Deep fry the prawns until they are golden brown and cooked from the inside

5. Serve with tahini dip and salad in a sandwich or on its own.

Happy cooking xx

Tahini marinated Barramundi fillets

Tahini marinated barramundi fillets

Tahini marinated barramundi fillets

Near my work there is a lovely little cafe that makes the most amazing meals. They do a baked barramundi that has all these complex flavours in it and I have been eating it at least twice per week for 3 weeks in order to figure it out….I finally determined that one of the secret ingredients was definitely tahini (sesame) paste. The rest of it was easy, there was soy, garlic, chilli, and green onions. At the cafe down the road i would hazard a guess that they marinate the fish and then take it out and wipe off the marinade before baking, but i chose a different route and I”m so glad that I did.
Firstly, I used barramundi fillets but any strong white flesh fish will do, get your fish monger to fillet them with skin OFF to maximise the exposure to the incredible marinade. Make the marinade in a separate bowl, then immerse the fish pieces in there – ideally overnight, but if all you can do is a few hours it will still be pretty darn good! Then when you place the fish in a baking dish make sure some of marinade remains on the fish, it will continue to infuse the fish with flavour as it heats up and cooks and it doubles as an INCREDIBLE tasting sauce. I would, without exaggeration, say this is one of my most favourite recipe creations all year. I would serve it with a white rice and salad, and you can adjust the amount of chilli to suit your family’s tastes. My recipe ended up being very spicy indeed but even my daughters finished theiri plates (and several glasses of water) because it was just THAT GOOD.

From my family to yours…HAPPY COOKING!!


Ingredients

4 larger barramundi fillets, skin off

1/2 cup tahini paste

1/2 cup white vinegar

3 green onions, sliced finely

Juice from 1 lemon

1/4 cup soy sauce

1/2 – 1 tsp cayenne chilli pepper (optional, adjust to suit your family)

1/2 tsp sweet paprika

6 tsp minced garlic (I know it sounds like a lot, but trust me)

salt and freshly ground black pepper to taste

Method

1. Combine all the ingredients except the fish in a bowl and stir until a smooth paste forms;

2. Test the marinade for salt and pepper and adjust seasonings

3. Immerse the fillets into the marinade and place, covered, in the fridge overnight (or at least a few hours)

4. Pre-heat the oven to 180 Celsius.
remove the fillets from the marinade and place in a baking dish, spooning a small amount of tahini sauce on top of each fillet. Bake the filets for 12-15 minutes, until the flesh is cooked and flakes easily

5. Serve with boiled white rice and a fresh garden salad, garnished with sliced green onions.

Happy cooking everyone xx

Prawn Jambalaya

IMG_5879Jambalaya is the Creole word for mess, and this recipe is a delicious mess! Flavoursome because of the spices and vegetables used, its a quick and easy seafood dish.  When not observing a vegan and seafood fast, this dish is heightened by the addition of fresh chorizo sausages and chicken along with the prawns. I hope that you enjoy!

Ingredients

  • 1 large onion, finely diced
  • 1 green pepper, finely chopped
  • 1 red pepper, finely chopped
  • 1 long green chilli, sliced thinly
  • 2 sticks celery, finely chopped
  • 2 bay leaves
  • 6 sprigs fresh thyme
  • 2 tablespoons smoked paprika
  • 2 tablespoons minced garlic
  • 1 x 400 g can diced tomatoes
  • 1.2 litres vegetable stock
  • 600 g long-grain rice
  • 500 g frozen prawns
  • 1 handful parsley, finely chopped
  • 3 spring onions, sliced
  • Salt and pepper to taste

Method

1. In a deep, wide saucepan sauté the peppers, onion and celery until softened

2. Add the chilli, garlic,  bay leaf, and smoked paprika and mix well

3. Add the tomatoes and vegetable stock, bring to the boil, then cover and reduce the heat for 7 minutes.

4. Add the rice to the mixture, give it a good stir, then place the lid back and keep on low heat until the rice is cooked. Stir every once in a while, ensuring you get what catches at the bottom of the pot

5. Just before the rice is fully cooked, add the prawns, mix well and cover.

6. The jambalaya is ready when the rice and prawns are cooked. Add the spring onions and parsley for extra zest and serve!

Happy cooking xx

IMG_5878

Spicy mixed vegetable curry

So today is the first day of St.Mary’s fast which means for most orthodox people, among other things, a change to a vegan diet with some seafood. On the first day of a vegan fast I like to make something where the flavour knocks your taste buds out of the park. Its a good reminder that vegan food can be incredibly tasty.

This curry is based off the recipe of one of my closest friend’s mothers who is an incredible cook. You can control the heat by increasing or decreasing the amount of chilli that you use, and the variety of delicious vegetables in this dish means its sure to satisfy anyone! I would say that the main veggie players in this recipe are potatoes, green pepper, and green onions – everything else can be varied to the vegetables that you and your family prefer, and it is sure to taste delectable.

I have served it on cumin and clove scented Basmati rice which really takes the dish to another level, but you are welcome to serve it on a medium grain rice if that is your preference.
From my family to yours…happy cooking xx

Spicy vegan mixed veggie curry

Spicy vegan mixed veggie curry

This Recipe serves 6

Ingredients

4 large potatoes, diced small
2 medium Green pepper sliced into bite size pieces
1-2 long green chillis, sliced into rounds (do not deseed if you wish to retain the heat)
3 spring onions, sliced
2 large carrots sliced
300 g mushrooms sliced
1/2 cup frozen peas
1 handful fresh coriander – finely chopped
3.5 teaspoons Coriander powder
3.5 teaspoons (mild/sweet) paprika
2 tsp turmeric
Vegetable oil

1. Season the potatoes with salt and sauté them in a deep, wide saucepan with a bit of oil until cooked (cover the saucepan to speed up cooking time but mix every once in a while). Remove from the saucepan and drain the excess oil on absorbent paper
2. Sauté the carrots,  green pepper, and chilli until softened then add the mushrooms and stir to combine

3. Add the potatoes back to the pot, and prepare to add the spices by creating a ‘hot spot” in the pan by pushing the vegetables to the side

4. Add the Coriander powder, paprika and turmeric. Fry together moving it in the hot spot for a minute or so until fragrant, then stir to combine with the rest of the vegetables.
5. Ensure the spice mix is well combined, and add the green onions and sauté for a few more minutes. Adjust salt seasoning and remove from the heat and add the fresh coriander and cover for a few minutes.

Serve with fragrant basmat rice or naan bread, even Lebanese bread tastes good with this dish. Its deceptively simple but tastes out of this world.

Fragrant Basmati rice

Ingredients

2 cups basmati rice
1 tablespoon oil
1/2 teaspoon cumin seeds
1/4 teaspoon whole cloves
1 bay leave

Method

1. Add the oil to the pan and heat

2. Add the spices to the oil and saute for about 30 seconds until fragrant but before they brown

3. Add the rice and 3 cups of water (Ratio for best results on basmati is 1 cup of rice to 1.5 cups of water)

4. Bring the mixture to the boil, uncovered and allow to absorb most of the water

5. Once most moisture is absorbed cover the pot and reduce heat to very low. Stir every once in a while and once the rice is cooked cover and allow to stand for a few minutes.

6. Fluff the rice with a fork and serve

Happy cooking xx

North Indian Chicken Curry

I have used my own version of an anglo-indian chicken curry (most similar to a butter chicken for years) It is both delicious and easy to make, however today I wanted to taste something different that would blow my mind away with the flavours and at the same time is a healthier option. For me, the antitheses to cream  based dishes is spice, you don’t need the richness of cream or butter in your dishes if you know how to use spice to make your mouth explode with flavour.

This curry has flavours of cardamom, cloves and coriander. It’s extremely light and you can control the heat factor so you can tone it down for the kids or ramp it right up ! This goes amazing with a glass of Sweet Shiraz and definitely serve with Basmati rice as it’s much healthier than medium grain rice, its lower GI and has more nutritional value – plus its amazingly yummy! I hope you enjoy. Everyone in my family loved this recipe, including my 20 months old boys! Happy cooking xx

IMG_5856

Ingredients

  • 4 tbsp vegetable oil
  • 1 large stick of cinnamon
  • 1.5 tsp ground cloves
  • 1.5 tsp  ground cardamom pods
  • 2 medium onions, finely diced
  • 2 tsp minced ginger
  • 1 tbspn minced garlic
  • salt, to taste
  • 1.5 tsp turmeric powder
  • 2 tbsp ground coriander
  • 1.5 tsp garam masala
  • 1 tablespoon tomato paste
  • 1-2 tsp dried chilli flakes (optional and to taste)
  • 1 can diced tomatoes
  • 1 kg  chicken tenders
  • 1 cups water (approx)
  • handful of fresh coriander leaves

Method

1. Heat the oil in deep, wide non stick saucepan. Add the chicken in batches and sear on both sides (they dont need to be fully cooked, they will continue cooking in the masala sauce)2. Add some more oil and add the onion and cinnamon stick and fry until the onion starts to soften and become golden.  Enjoy the aroma here – there is really nothing like fresh cinnamon bark and onion frying together! A hint of the flavours to come.
4. Add the tomato paste, ginger and garlic to the pan and cook for about a minute then add salt and spices.  Stir for a further 20 – 30 seconds.
5.  Pour in the can of diced tomatoes and cook over a moderate heat until it starts to bubble

6. Add the chicken and mix well with the masala base, then add the cup of water

7. Bring to the boil and then cook over very low heat until the chicken is cooked, this should take no more than 10-15 minutes. do not overcook as that will cause the chicken to become dry.

8. Just before serving, stir in the fresh coriander leaves.  Serve with a side of aromatic basmati riceEnjoy and happy cooking xx

Intense Chocolate and Peanut Butter Brownies

IMG_5844

I love an intensely chocolatey brownie, and this one is turned into amaze-balls status by the addition of peanut butter. Its a dangerous recipe because it is so decadent! I hope you enjoy. From my family to yours, happy baking xx

Ingredients

225 g unsalted butter
1 cup dark chocolate chips
220 g dark chocolate (crushed into small pieces)
6 extra-large eggs
1 tablespoon instant coffee granules
1 tablespoon pure vanilla extract
1 1/2  cups sugar
1/2 cups plain flour, plus an extra 1/4 cup for
2 teaspoons baking powder
1 teaspoon salt
1/2 cup smooth peanut butter

Method

1. Preheat the oven to 180 degrees C . Butter and flour a 12 x 12 inch sheet pan.

2. Melt together the butter, and the dark chocolate in a pot over very low heat. and allow to cool

3. In a large bowl, stir (do not beat) together the eggs, coffee granules, vanilla, and sugar. Stir the warm chocolate mixture into the egg mixture and allow to cool to room temperature.

4. In a medium bowl, sift together the 1/2 cup of flour, the baking powder, and salt. Add to the cooled chocolate mixture.

5. Toss the chocolate chips in a medium bowl with 1/4 cup of flour, then add them to the chocolate batter.

6. Pour into the prepared sheet pan. Spoon the peanut butter over the top of the chocolate mixture and using a knife, swirl it through the chocolate mixture.

7. Bake for 20 minutes, then rap the baking sheet against the oven shelf to force the air to escape from between the pan and the brownie dough. Bake for about 10 to 15 minutes more or until a toothpick comes out clean. Do not overbake! Allow to cool thoroughly, refrigerate, and cut into large squares.

Happy baking xx

French Onion Soup

I first tried this soup at my favourite french restaurant, as an Amuse Bouche (ie a tiny drop of soup which made me crave more more more) I have been playing with this recipe for some years now. When you the whole way, and make the soup as well as the cheesy garlicky sourdough bread topping, this soup is quite satisfying as a meal in itself. Definitely do not plan to serve anything heavy after serving this soup. I have successfully used this soup as an entree in dinner parties by using the soup recipe only, and serving a tiny cupful, almost a shot glass.

The soup itself is rich with caramelised oniony goodness. It has an earthy flavour which is derived by using been consomme rather than regular beef stock, as well as red wine. It is the most perfect thing to have for an early dinner on a cold winter’s day with a deep dark glass of red wine. I hope you enjoy

French Onion Soup

French Onion Soup

Ingredients

Serves 6

For the soup

90 g butter
4 large onions, sliced thinly
2 cloves garlic, minced
1 tablespoon flour
4 cups beef consomme
3 cups water
3/4 cup red wine

For the bread topping
6-8 slices of sourdough, sliced thickly
3/4 cup olive oil
2 cloves minced garlic
250 g gruyere cheese, shredded
60 g parmesan (preferably Reggiano), shredded

Method

1. Heat butter in a pan, add the onions until they begin to turn golden brown

2. Add the minced garlic, and continue to cook until all the onions are golden brown (be careful not to allow the onions to caramelise completely)

3. Add the flour and stir until combined

4. Slowly add the Consomme, water, red wine and stir until combined.

5. Add salt and pepper to taste

6. Bring to the boil, then reduce the heat and leave to simmer uncovered for 45 minutes

Serve into to ramekins (you can eat it just like this at this stage, or continue for the cheesy bread topping)

7. Put the oil and the garlic for the bread in a bowl together

8. Ensure your pieces of sourdough fit inside the ramekins you will use to serve the soup in

9. brush the bread slices on both sides with the olive oil and garlic mixture

10. Place the bread under the hot grill until the top becomes golden brown

11. Place the bread, grilled side DOWN in the soup and top the other side with the melted cheese

12. Place the ramekins in the oven until the cheese has melted and starts to brown.

Angel food cake with a vanilla pudding and strawberry filling!

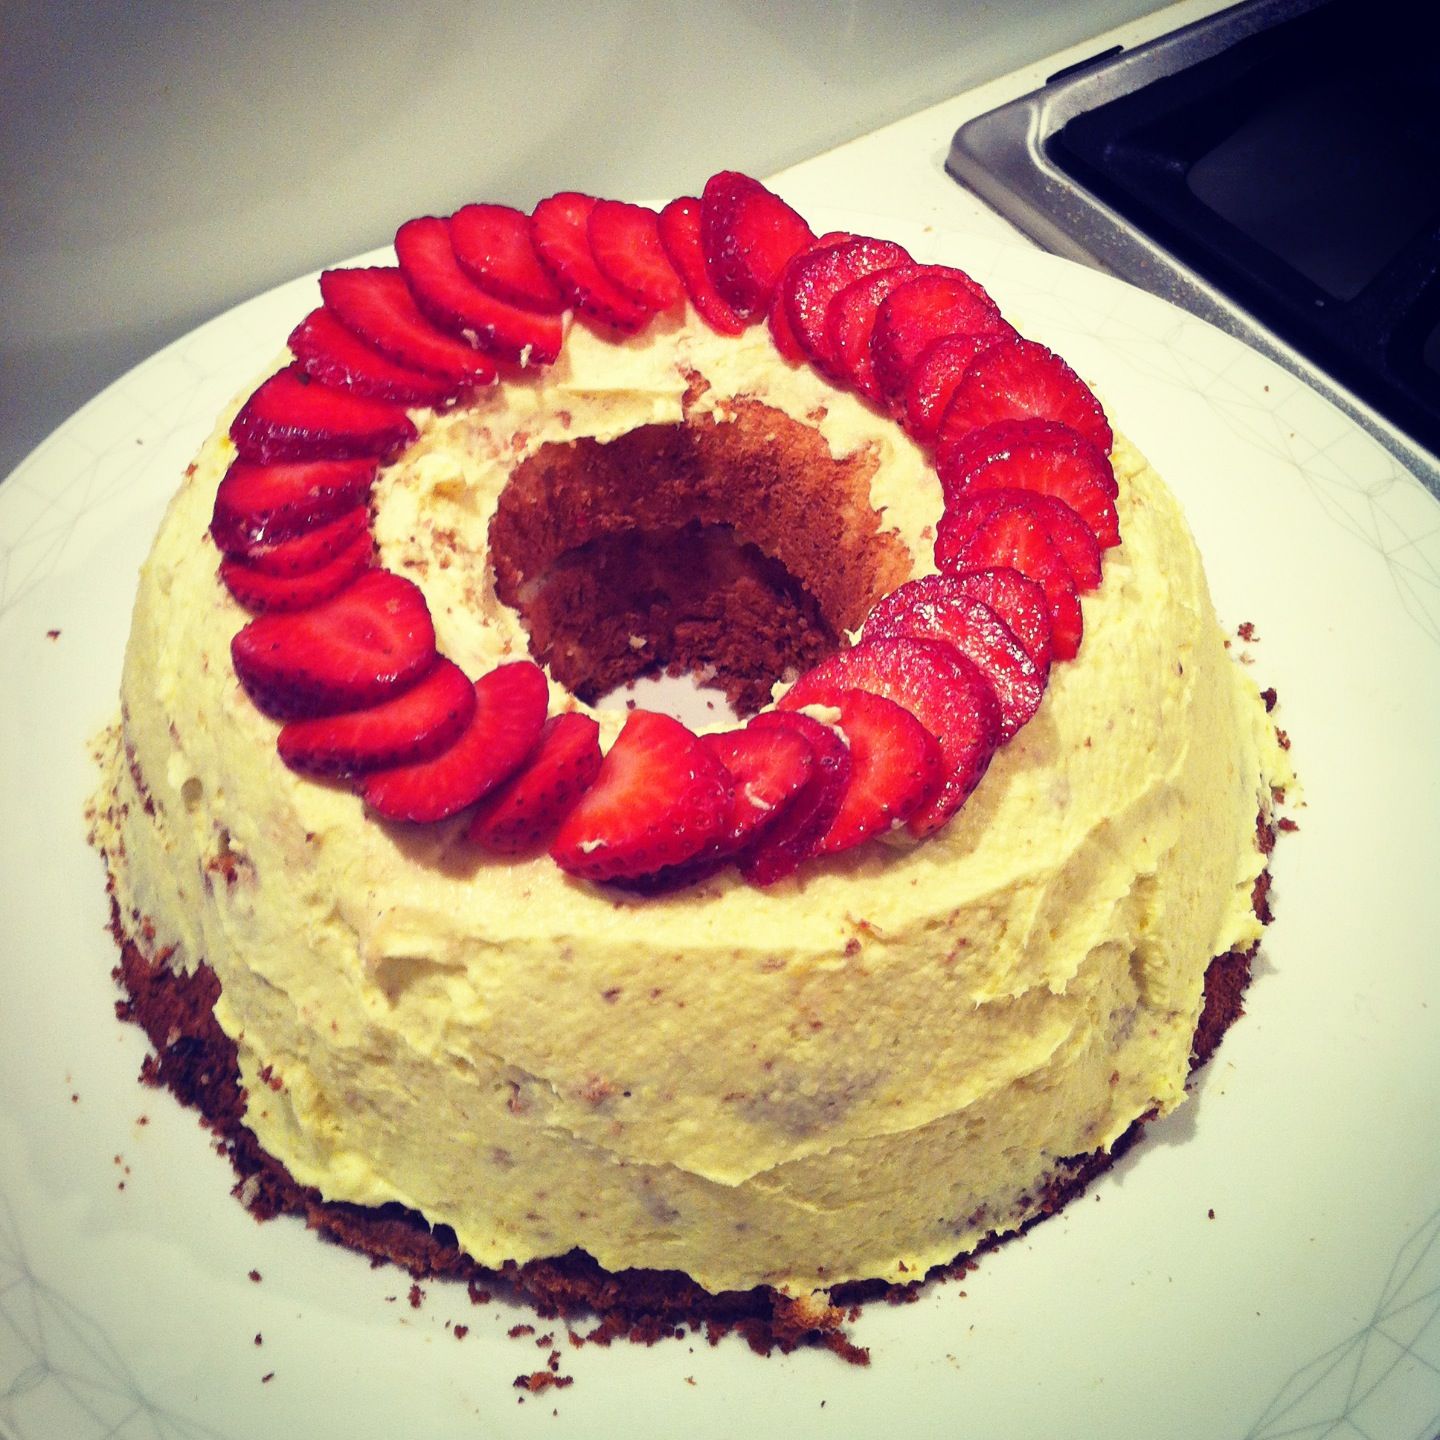
The healthiest cake in the world….

IMG_5842

I’ve heard about Angel Food cake before, but as I am normally a fan of indulgent desserts, I have never been interested to try it. Given that it has been declared healthy food month, I scoured my recipe books for an appropriate healthy dessert recipe that wasn’t fruit salad related. I came across this cake – which is a meringue based cake, and contains NO FAT! The recipe is itself a bit perplexing….it doesn’t seem like it will work, however…i assure you…work it does!!

The finished product is like biting into a cloud. its light, and fluffy, airy and deeeelicious. I had to add a filling (I just couldn’t help myself) So there is an optional vanilla pudding with strawberry recipe here if you want to add some indulgence.

Now I warn you this cake is a bit fiddly. There is no raising agent except for the egg whites so you have to be very kind to the batter to ensure it rises as much as it should. I recommend the following:

1. Ensure the egg whites are at room temperature

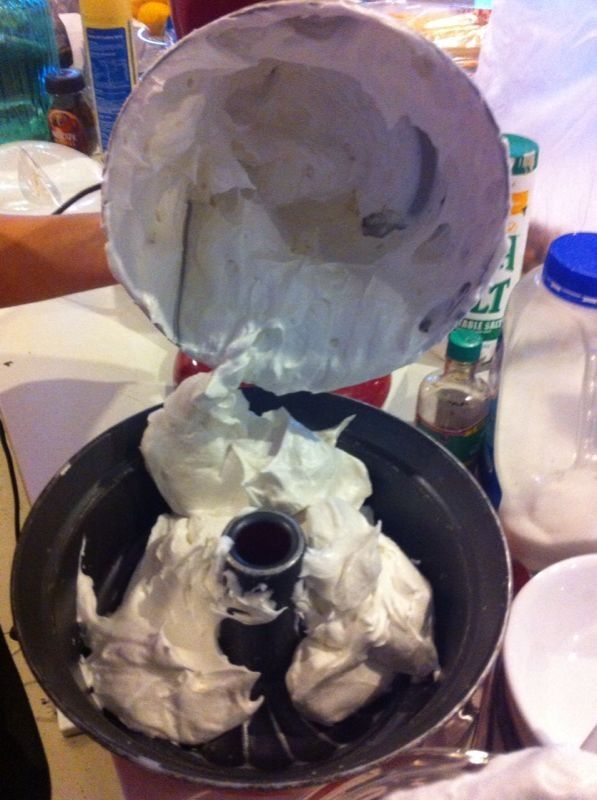
2. Use a two piece ringed pan

3. Ensure the bowl you mix the egg whites in, as well as the mixer is thoroughly cleaned with lemon and completely dry as any existence of fat will stop the egg whites from rising

I hope that you enjoy. From my family to yours Happy Baking xx

Ingredients

125 grams sifted plain flour

300 grams white sugar

12 egg whites

1 teaspoon cream of tartar

1/2 teaspoon salt

1 tablespoon fresh lemon juice

2 teaspoons vanilla extract

Method

1. Preheat oven to !80 degrees C and place rack in centre of oven. 

2. In your electric mixer, beat the egg whites until foamy. Add the cream of tartar, lemon juice, and salt and continue to beat until soft peaks form.

3. Gradually beat in  the sugar, a tablespoon at a time, until glossy stiff peaks form. To ensure the sugar has been completely absorbed, rub a bit of the mixture between your fingers, if you can feel the sugar granules – it needs to be beaten a bit more.

4. Beat in the vanilla extract and almond extract.

5. Sift the flour mixture over the egg whites (about one quarter of the flour mixture at a time) and gently but quickly fold (do not stir) the flour into the egg whites. 

6. Pour the batter into the pan and run a metal spatula or knife through the batter to get rid of any air pockets. 

IMG_5824

7. Smooth the top and bake in the preheated oven for about 40 -45 minutes. 

IMG_5822

Expect the top of your cake to have cracks – this is normal

8. Immediately upon removing from the oven invert the pan.  Suspend the pan by placing the inner tube on the top of a wine bottle or flat topped glass. Allow the cake to cool for about 1 1/2 hours. This is to ensure that the cake does not fall while cooling. it is an essential step do not skip it. 

inverted pan on a mug

inverted pan on a mug

9. When completely cool, run a metal spatula or knife around the sides of the pan to loosen the cake and then remove the cake from the pan. Next, run a metal spatula or knife along the bottom and center core of the pan and remove. Use a back and forth motion to cut the cake and fill it

Vanilla Pudding Filling

1 x 100g packet instant vanilla pudding (I used cottees)

600 ml thickened cream

Beat the ingredients together until it thickens, but is still spreadable.

Cut the cake in half using a serated knife. Fill with 1/4 of the vanilla pudding and hulled, sliced strawberries, then put the cake back together and cover with the pudding and decorate with more strawberries.

ENJOY! xx

IMG_5843

Mexican Chicken Stew

Healthy cooking month!

mexican chicken

I have declared this to be healthy cooking month, so I am looking for recipes where the flavour comes from herbs and spices rather than cream and butter. The flavours in this recipes are truly astounding, you can expect a full on party in your mouth at any point in time. It’s fresh, it’s zesty, it’s extremely easy to make and its very healthy!

I have served it with quinoa here, which is a supergrain from south america. The best thing about it is that it acts like rice and soaks up the yummy goodness of the sauce and gives you something else to chew and enjoy while not being a simple carb rather a complex superfood that is high in protein. Cooked correctly quinoa is a perfect rice substitute and its texture is delightful to the palate.

I have included a dollop of spiced yoghurt in this recipe because the mild heat and spices from the chicken are mellowed beautifully by some healthy spiced yoghurt.

I cannot recommend this recipe highly enough! Enjoy and happy cooking xx

Ingredients

1 kilo chicken tenders
1/2 cup plain flour
1 onion, roughly chopped
2 capsicum, roughly chopped
2 tsp minced garlic
1 can diced tomatoes
2 cups chicken stock
1 tablespoon oregano
2 teaspoons cumin
1 tsp smoked paprika
1/2 tsp chilli flakes
2 tbsp Worcestershire sauce
1/2 lemon (juice only)
1/2 bunch coriander finely minced
1 can corn (drained)
1  can mexi beans (drained)

Salt and pepper to taste

Method

1. Place the chicken tenders in a bag with the flour and season
2. Using minimal oil, pan fry the chicken tenders and set aside
3. Place the onions and capsicum in the pan and saute until softened

4. Add the garlic and spices and fry until fragrant

5. add the canned tomato and stock and bring to the boil

6. Place the chicken tenders back in the pot, reduce heat,cover and leave to simmer for 15 minutes

7. Add the corn and beans and simmer for a further 5 minutes.

8. Add the juice of a half the lemon, the minced coriander and adjust seasoning for salt and pepper

Serve with Quinoa and a dollop of seasoned Yoghurt

Quinoa

1. Soak 1 cup of quinoa in 2 cups of water for 15 minutes, then drain

2. Place the quinoa in a pot and cover with 2 cups of chicken stock, and a bit of salt

3. cooking using the absorption method used to cook rice. iei let it come to the boil and absorb most of the liquid, then reduce heat, cover and simmer. Once all the liquid has been absorbed turn off the heat and allow to stand before fluffing with a fork

Yoghurt

Place your desired quanitty of yoghurt in a bowl and season with salt, cumin and a touch of smoked paprika.

Enjoy and happy cooking!